Azure DevOps Guidelines
Version: 1, effective date: 01-Dec-2021
Contents
Document plan
-
Create project
-
Assign permissions (teams, roles, users)
-
Fill repositories
-
Create environments/setup deploy agents
-
Create/fill variable groups
-
Create pipelines
1 PREPARE PROJECT
- Project creation
Create a project according to the name of the application.
The best practice for naming is using the Configuration item name based on ITSP. (e.g. for PRCheckTool: JTI-TAT-PRCheck)
- Add teammates to the project team.
Use the “Invite” button:
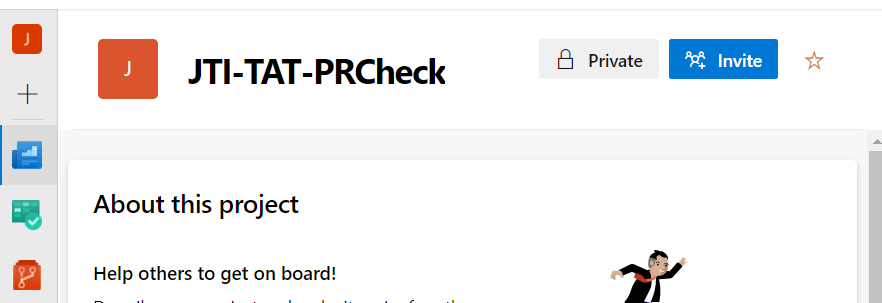
Available two types of accounts:
- AD JTICORP account.
ITSP form: Network account for consultant/contractor
Duration: 12 months
ITSP access: Yes
AD security group membership: Yes
Access from external infrastructure: VDI or JTI laptop.
Access to JTI infrastructure: Yes
Visual Studio contribution to JTI DevOps repos: JTI laptop, only!
- B2B account
ITSP form: B2B account creation
Duration: 3 months.
ITSP access: No
AD security group membership: No
Access from external infrastructure: Yes
Access to JTI infrastructure: Office365 (Sharepoint sites, Teams, etc.) and Azure DevOps
Visual Studio contribution to JTI DevOps repos: Yes
- User permission
Developers – development and support team (e.g. external vendor)
Stakeholder – product owner, business colleagues or BTS team (non IT)
DevOps – DevOps admins: pipeline management and configuration.
Tester – Testing team
Admin - IT Owner of application
1.1 Access matrix
| Stakeholder | Developer | Tester | DevOps | Admin | |
|---|---|---|---|---|---|
| General | |||||
| Delete team project | |||||
| Edit project-level information | + | ||||
| Manage project properties | + | ||||
| Rename team project | + | ||||
| Suppress notifications for work item updates | + | ||||
| Update project visibility | + | ||||
| View project-level information | + | + | + | + | + |
| Boards | |||||
| Bypass rules on work item updates | + | ||||
| Change process of team project. | + | ||||
| Create tag definition | + | + | + | + | + |
| Delete and restore work items | + | + | + | + | + |
| Move work items out of this project | + | ||||
| Permanently delete work items | + | ||||
| Analytics | |||||
| Delete shared Analytics views | + | ||||
| Edit shared Analytics views | + | ||||
| View analytics | + | + | + | + | + |
| Test Plans | |||||
| Create test runs | + | + | |||
| Delete test runs | + | + | |||
| Manage test configurations | + | + | |||
| Manage test environments | + | + | |||
| View test runs | + | + | + | + | + |
| Repositories | |||||
| Bypass policies when completing pull requests | + | ||||
| Bypass policies when pushing | + | ||||
| Contribute | + | + | + | + | |
| Contribute to pull requests | + | + | + | + | |
| Create branch | + | + | + | + | |
| Create repository | + | ||||
| Create tag | + | + | + | + | |
| Delete repository | + | ||||
| Edit policies | + | ||||
| Force push (rewrite history, delete branches and tags) | + | ||||
| Manage notes | + | ||||
| Manage permissions | + | ||||
| Read | + | + | + | + | + |
| Remove others’ locks | + | ||||
| Rename repository | + |
2 TASKS PLANNING
2.1 Processing type of your project
Ensure that your project has a proper processing type:
- Go to Project settings
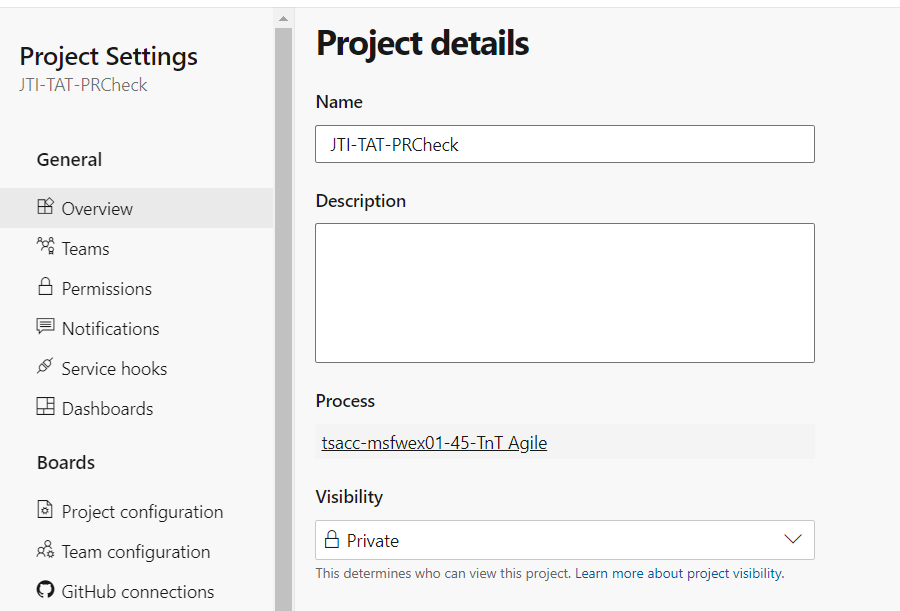
- Click Process:
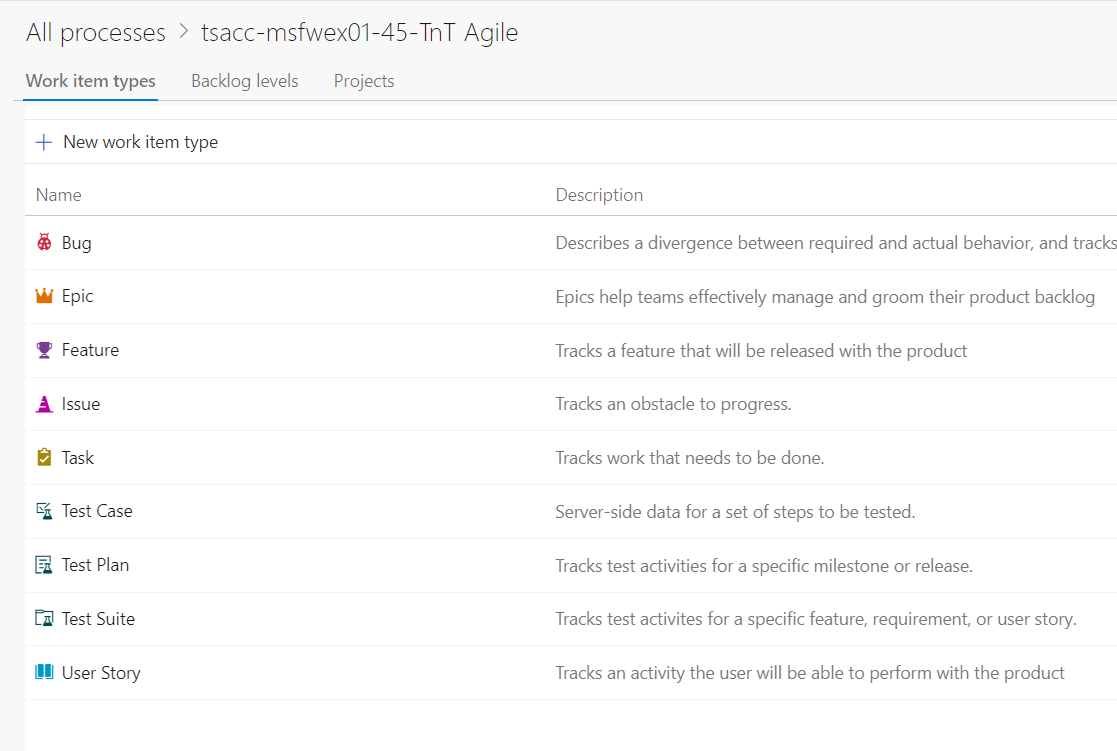
- Check all tasks in the list (if not enough, please add a new one or change Process type)
Recommended but not limited to use the following types of task:
Epic
An Epic is an immense user story that should be broken down into smaller and more measurable stories in progress. If a work item is so big that it probably won’t fit into a sprint or is not clearly understood in terms of customer requirements, it should be broken down into stories.
Usually defined during initial product road mapping and decomposed into stories in the product backlog as more is learned.
User story (Feature)
Something actionable and small enough to fit in a sprint.
Usually created throughout product development, more so leading up to iteration planning and also during higher level product road mapping.
Task
Decomposed parts of a story that get into how the story will be completed
Can be hour estimated if desired.
Usually defined by the people doing the work (developers, QA, etc.)
3 CODE STORAGE/COLLABORATION
3.1 Azure DevOps
- Repositories creation
Create three git repositories:
-
app (for application) - a
-
test (for storage auto test sources) - t
-
devops (for devops pipelines) - d
- Assign permissions for repositories
| Stakeholder | Developer | Tester | DevOps | Admin | |
|---|---|---|---|---|---|
| Repositories | |||||
| Bypass policies when completing pull requests | atd | ||||
| Bypass policies when pushing | atd | ||||
| Contribute | a | t | d | atd | |
| Contribute to pull requests | a | t | d | atd | |
| Create branch | a | t | d | atd | |
| Create repository | atd | ||||
| Create tag | a | t | d | atd | |
| Delete repository | atd | ||||
| Edit policies | atd | ||||
| Force push (rewrite history, delete branches and tags) | atd | ||||
| Manage notes | atd | ||||
| Manage permissions | atd | ||||
| Read | atd | atd | atd | atd | atd |
| Remove others’ locks | a | t | d | atd | |
| Rename repository | atd |
4 CODE WORKFLOW
4.1 Common
Recommended use one of two described below.
Recommendation from Microsoft here
4.2 Pull-request requirements
On each task with feature or bugfix in repository created corresponding branch. To merge this branch, the developer should make a pull request. Each pull request must pass three stages before merging:
-
code review
-
quality gate check (statical code analysis, SonarCloud, SonarQube, etc.)
-
unit test pass
4.3 Branch naming convention
Main: “master”.
Release: “release/…”, with an id of release, contains two digits. For example: “release/1.0”, “release/2.1”. The final version of the application will have three digits, where the third digit is the build number. For example: 1.0.51, 2.1.19.
Feature, bugfix, hotfix: branch name with an id of the task in Azure Board. For example: “feature/145”, “bugfix/431”, “hotfix/518”.
4.4 Release management: Microsoft recommended approach (default)
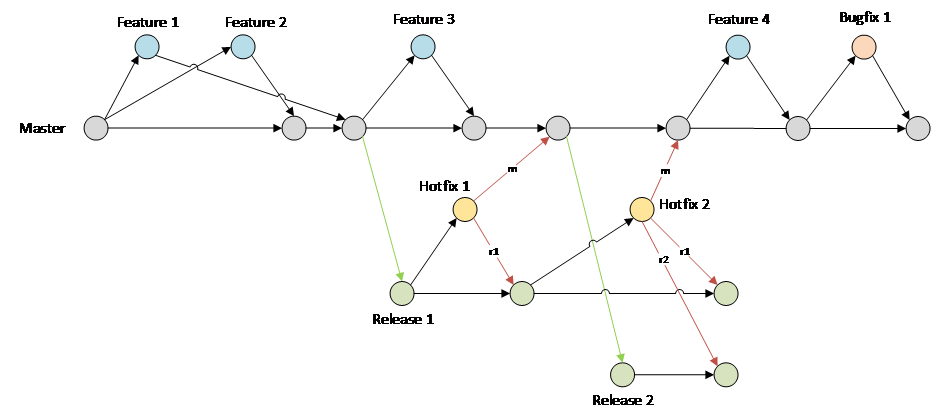
The main branch is master. Features and bug fixes are created from the master branch and finally merged into the master. When all features planned in the release are merged into master, release the branch created from master.
After the release branch is created, no more features or bug fixes will be merged into the release. If something needs to get fixed, create a branch hotfix from the release branch. The hotfix will be merged both into the master branch and the release (also in all following release branches, if exists). This allows avoiding regression.
Using branches: master, release, feature, bugfix, hotfix.
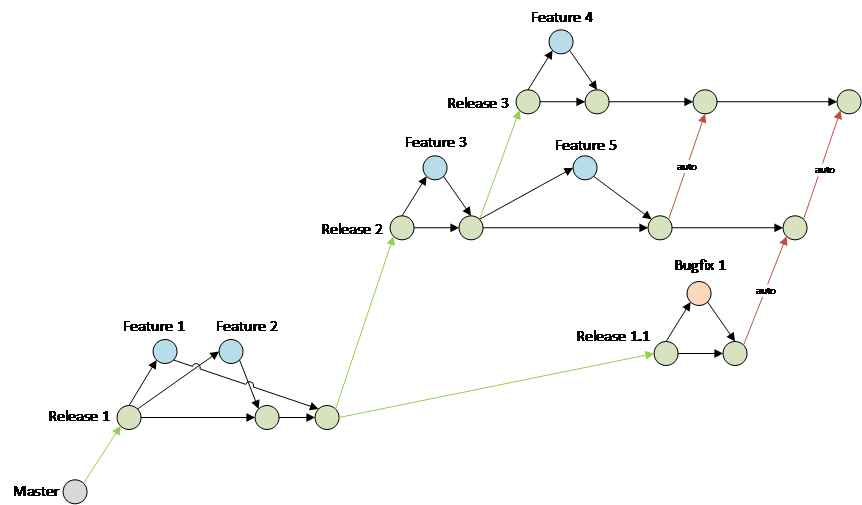
4.5 Release management: Additional approach (for complicated projects)
There is no main branch. There is a current branch – the current release branch. First, release branch created from master. After that, the master branch will not be used anymore for work with functionality.
Features and bug fixes are created from the necessary release branch and merged back into that branch.
Each merge into the release branch automatically makes a merge in the next release branch by a chain. This allows avoiding regression.
5 ENVIRONMENT
5.1 Users
Create application users for each environment.
For example:
-
JTICORP\Z_TAT_PRCHECK_DEV
-
JTICORP\Z_TAT_PRCHECK_QA
-
JTICORP\Z_TAT_PRCHECK_PROD
5.2 Permissions
Permissions to deploy should be assigned to this user/group depending of the environment
| Environment | Deployment User/Group |
|---|---|
| DEV | JTICORP\Z_TAT_DEPLOYMENT |
| QA | JTICORP\Z_TAT_DEPLOYMENT |
| PREPROD | JTICORP\Z_TAT_DEPLOYMENT |
| PRODUCTION | JTICORP\Global-IT-TT-DevOps-Deployment |
5.3 Server permissions
Deployment user/group should have permission to modify folder, where web application and windows service deployed. Also, should have permission to start/stop application pools and start/stop windows service.
5.4 MSSQL server
Deployment user/group should be a member of db_ddladmin, db_datareader, db_datawriter, db_backupoperator, db_securityadmin roles of the target database and should have “execute” permission.
Application users (e.g., JTICORP\Z_TAT_PRCHECK_DEV for PRCheckTool on DEV) should exist in users in target DB and should be members of db_datareader, db_datawriter and “application” roles.
Role “application” additionally created in DB. This role is populated with permissions of objects in the database by DACPAC (DBProject)
There will be clear specification about roles needed on each application standard / integration guide. This is only a basic specificaciton of rights.
5.5 Internet Information Server (IIS)
No additional requirements
5.6 Azure Agent installation
Azure Agent installed as windows service and runs under JTICORP\Z_TAT_DEPLOYMENT user.
The folder where the agent is installed should be excluded from antivirus software to avoid locking files during downloading and installing.
6 Delivery workflow recommendations
6.1 Application delivery needs
The application must have environment-depended parameters.
6.1.1 Depended parameters
Used to separate parameters for each environment. Parameters stored outside from application distributive. The application must take those parameters from the running environment or configuration file, separated from distributive. Configuration file applied by DevOps pipeline when deployed on a specific environment.
For example: MS SQL Database host, credentials.
6.2 Delivery environment (pipeline stages)
All applications must be connected for environments QA(IT, UAT), PreProd(Staging), Prod, but only inside one environment. For manual or developer tests, it’s allowed to connect some application for a while between Dev and QA.
6.2.1 Dev (Developing, unit-test, QG)
Used for testing by developers, processing unit-test, checking by quality gates (SonarCloud, etc.). Applications in this environment may be isolated from another application, maybe not.
6.2.2 QA
Used for processing automation testing, integration testing, testing UI, and running manual tests. Load tests are also carried out here.
When there is a need to separate functional and load tests, the QA environment splits into IT (integration test) and LT (load test). For example, when LT used many or massive servers, what may be used to test another application when idle current application tests.
6.2.3 UAT
Used to process user acceptance testing.
6.2.4 Staging (PreProd)
Used for testing application installation. Successfully passing this test means that the application is ready to deploy to Prod.
6.2.5 Prod
Live production environment.
6.3 Delivery roles
| Environment | Developer | QA | BTS | DCO |
|---|---|---|---|---|
| DEV | Develop | |||
| QA | Support | Test | Configuration | |
| UAT | Support | Test | Accept | Configuration |
| Staging | Support | Analyze | Configuration | |
| Prod | Configuration |
6.4 Delivery pipeline
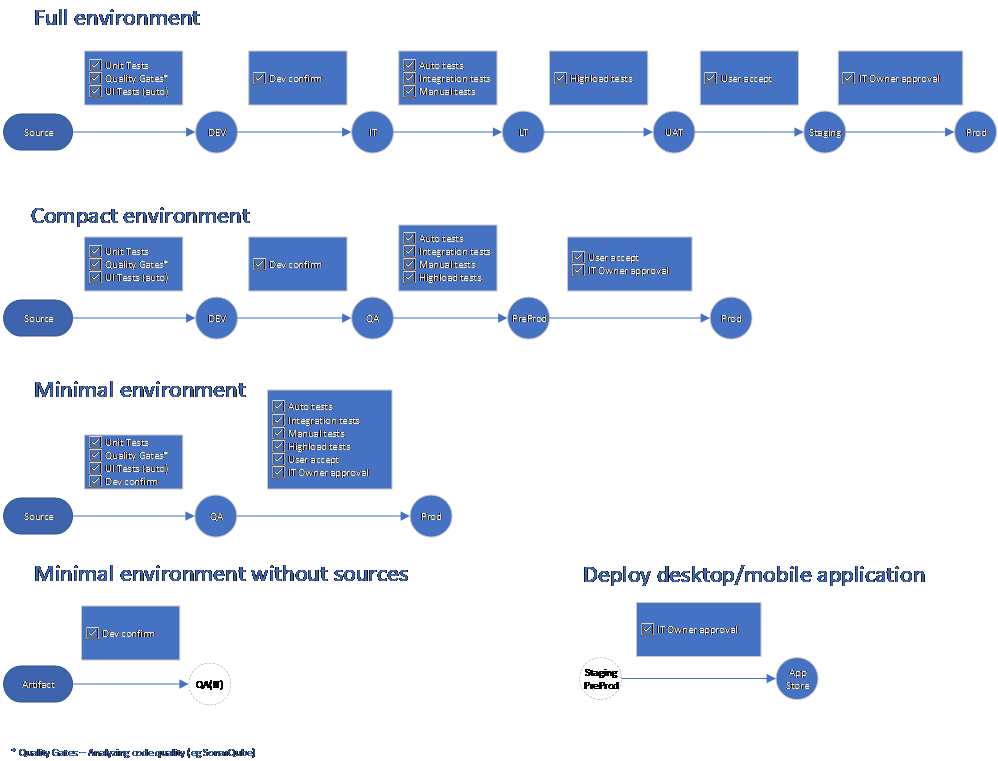
A pipeline consists of stages and checks. On each stage launched specific checks(automated or manual). Some stages may not be used. It’s recommended to apply all of the checks, even if some of the stages are not used.
To simplify work and reduce cost for each application can be applied one of several delivery pipelines.
Recommended making checks with source code (unit-test coverage, quality gates, etc.) if possible. If it’s not possible (sources unavailable), the pipeline started from QA (may start from Dev if needed).
If the application is finally deployed to desktops or mobile devices, there is an “App store” instead of a Prod environment. It may be Apple App Store, Google Play, Microsoft Store, or internal resources from which the application can be installed. Deploying to each App store may be automatic or semi-automatic by creating a ticket/email for a responsible person who can upload the application.
7 DEVOPS PIPELINES
7.0.1 DevOps pipelines creation
Push devops pipelines source code into repository “devops”, branch “main”.
Create pipelines:
-
“Check Branch” from check.yml
-
“Build” from build.yml
-
“Deploy” from deploy.yml
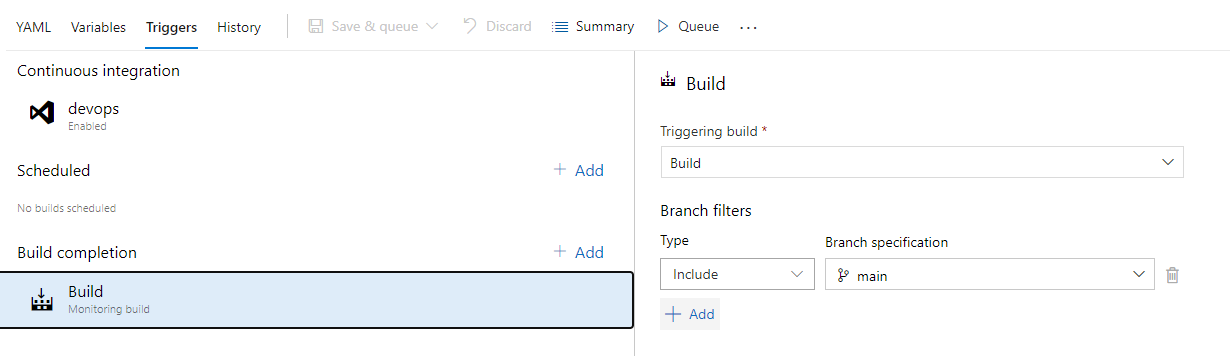
If necessary, add a trigger to Deploy pipeline after Build complete:
Deploy pipeline -> Edit -> Triggers
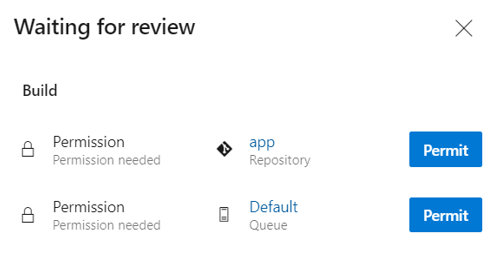
When pipeline first run, permit the pipeline to access:
- agent pool Default
- app repository

7.0.2 Application repository policies
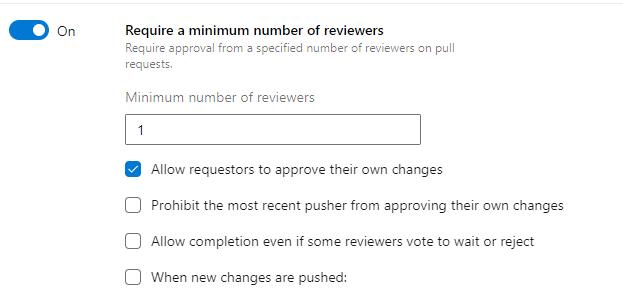
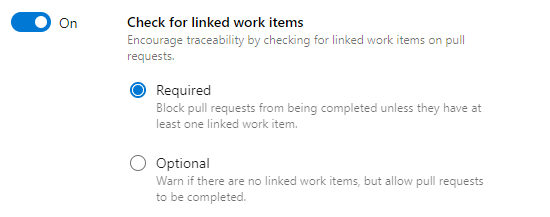
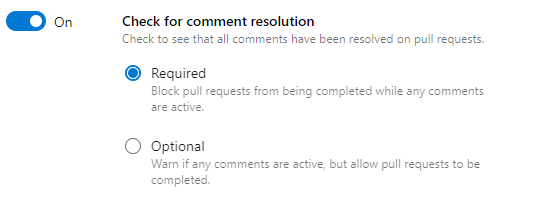
For release/* branches set policies:
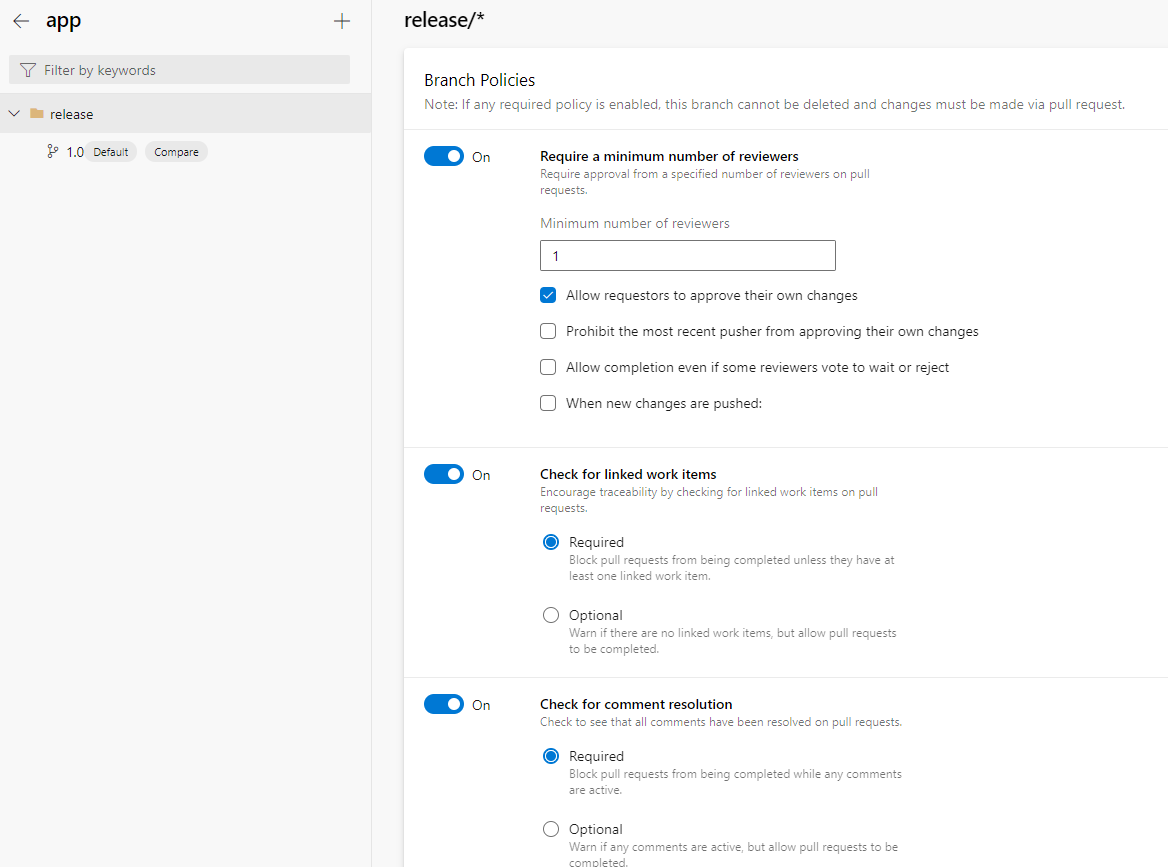
- Require a minimum number of reviewers
- Check for linked work items
- Check for comment resolution
- Build validation
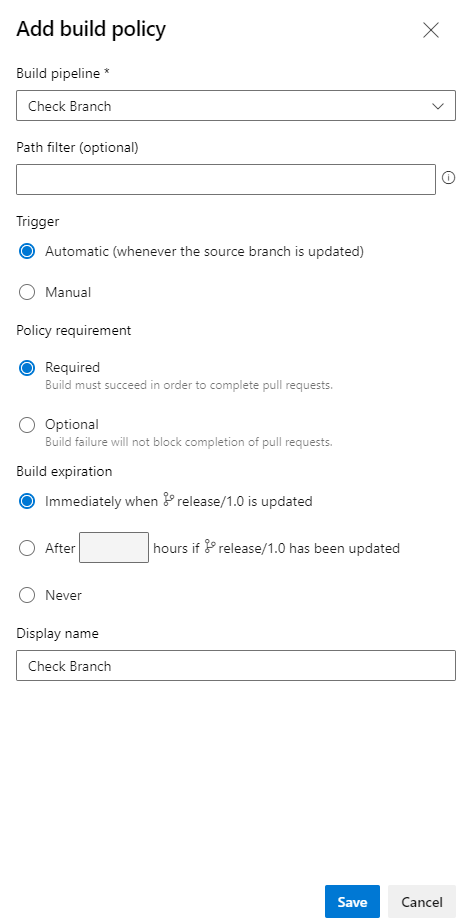
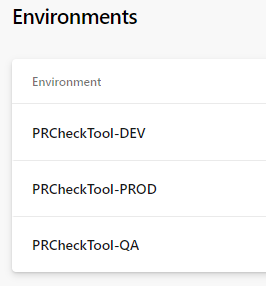
7.0.3 Add corresponding environments
For example:
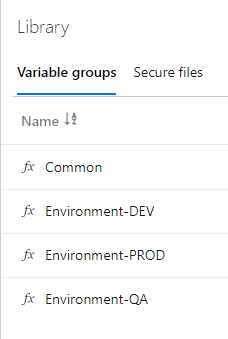
7.0.4 Create Variable group(groups) for each environment
For example:
7.0.5 Assign variable group(groups) and environment to jobs in the deploy pipeline

8 Fill environments with servers (+tags)
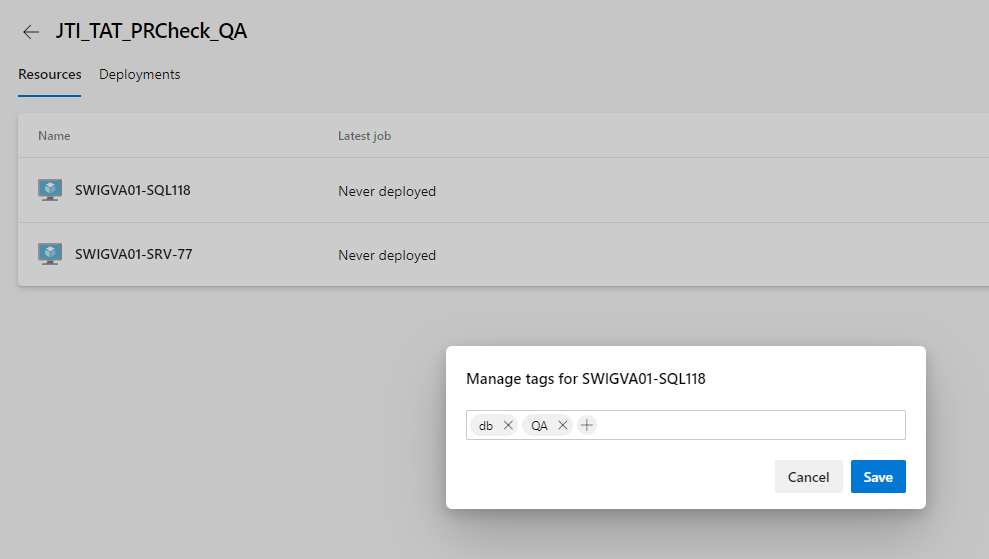
Each environment should be filled with target servers. For each server should be defined tags as roles of server.
Example roles:
-
db – for database
-
service – for windows service
-
web – for web application
Recommended to add a tag with environment name (DEV, QA, PROD, etc.)
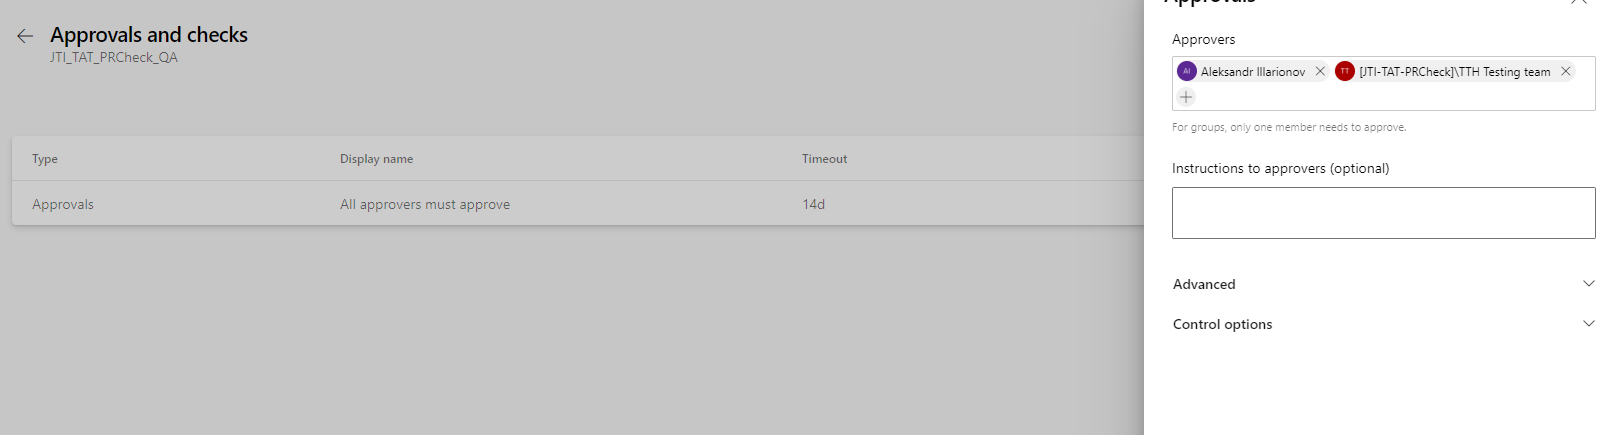
9 Configure environment approvals
An approval person(or people) must be defined for testing and production environments to approve each deployment. Approvers may be users or teams of the project.
9.1 Revision History
| Version | Effective date | Purpose of change | Author |
|---|---|---|---|
| 1 | 01-Dec-2021 | First version of the document | Aleksandr Illarionov |
ANY QUESTIONS?