WIR Repair Tool Overview
Version: 1, effective date: 20-Jun-2022
Contents
1 Standard description
This document will define the details of the WIR Repair tool and how to use it. WIR Repair tool’s main benefit is performing required repair steps without a manual and time-consuming process when many products need repairing.
2 Document objectives and benefits
2.1 Objectives
Objectives of the document are:
-
Details about how Repair Tool works
-
Installation process
-
Software dependencies
-
User permissions and access requirements
-
Integration with other T&T systems
2.2 Benefits
The document is designed to share the technical overview of Repair Tool with related colleagues and guide future developers on the project as a stepping stone.
3 Definitions
| Abbreviation / Term | Explanation |
|---|---|
| WIR | Warehouse Inventory Repair |
| PR | Primary Repository |
| CR | Corporate Repository |
Please refer to IT Glossary in the IT P&P portal for further definitions.
4 How to download WIR Repair Tool
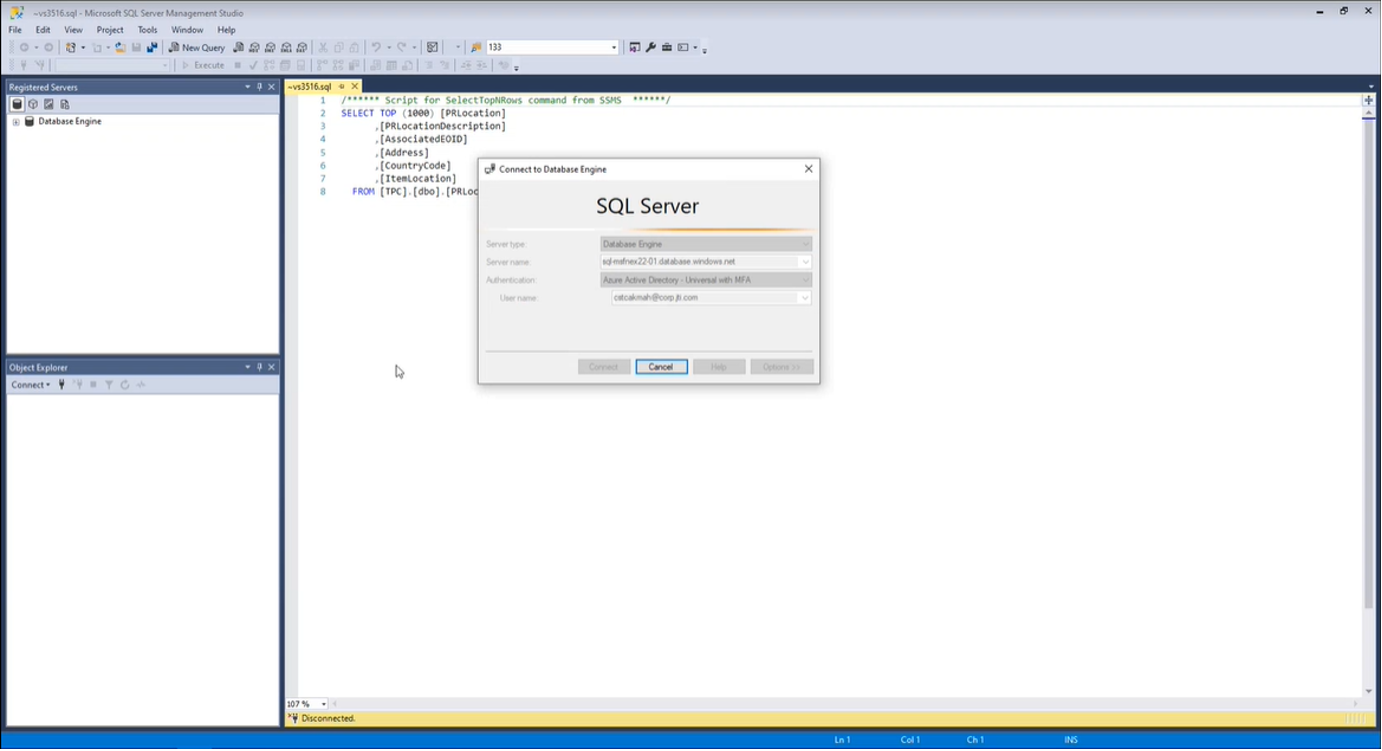
Besides the requirements below, you don’t need anything else to start using WIR Repair Tool: - To be able to use WIR Repair Tool, you must have access to PR Check Tool’s TPC database since sometimes you might need to update a few tables during the repair process. Anyone with access to the TPC database can use the WIR Repair Tool without issues. - You can download the WIR Repair Tool’s latest version here.
- While using CR APIs, you can connect to the SQL database by using one of the credentials of the existing location.
5 WIR Repair Tool Interface
When you open the WIR Repair Tool, the interface looks as it seems below:
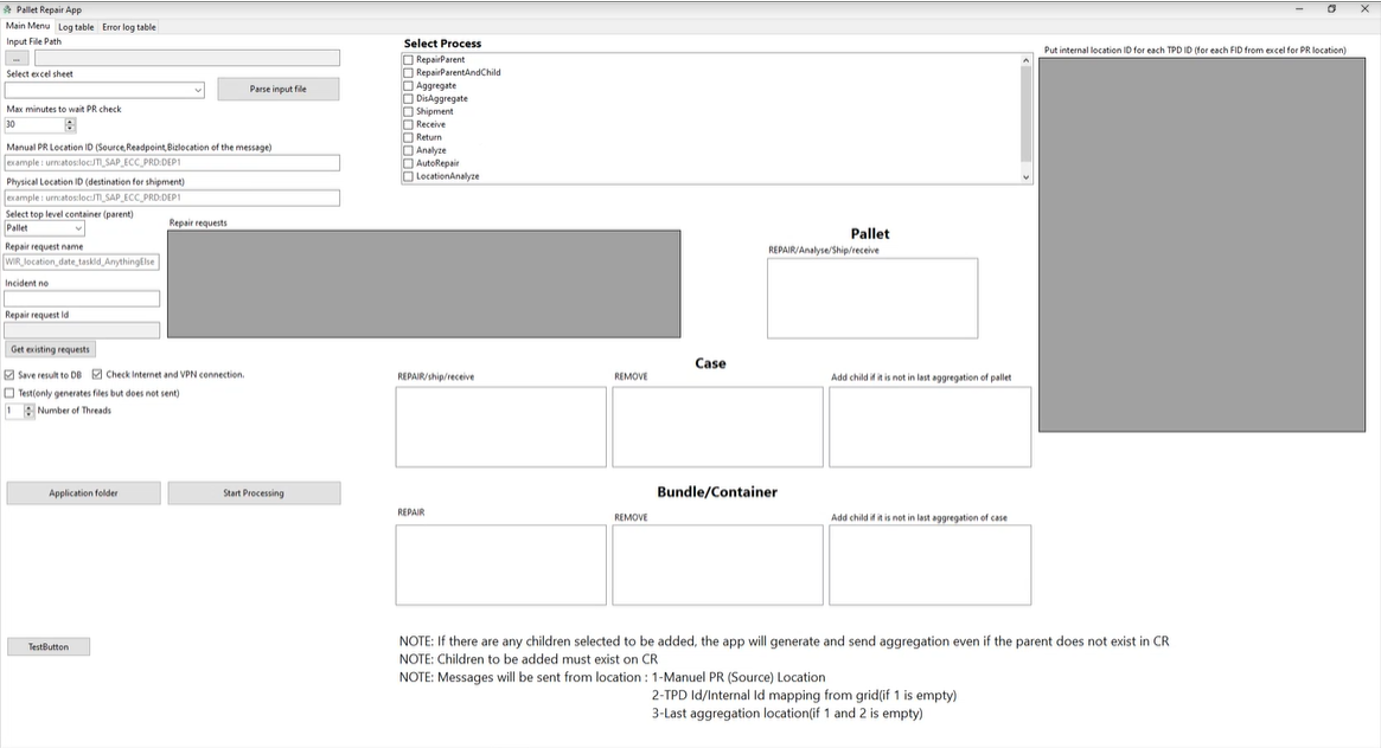
Under the “Select Process” section, all of the options are not available for use. Here are the process options you can use:
-
RepairParent
-
RepairParentandChild
-
Aggregate
-
DisAggregate
The locationAnalyze option works, but it’s a heavy process, so to prevent pushing too many messages to CR and causing a blockage, it’s not suggested to use it.
Leftover options such as Shipment, Receive, Return, Analyze, and AutoRepair are not available.
You can select the parent of the product via the “Select top level container (parent) section. You have two options to choose from: pallet and case.
The repair request id is automatically generated and comes from the database.
There is also an option for you to choose from if you want to save your changes to the TPC database or not. To do that, you need to click on the checkbox “Save results to DB”. When this option is selected, your changes will be permanent after completing the process.
For example, if you take a mastercase out of a pallet and select this action, this action will be recorded on the Primary Repository. This way, colleagues in the related locations can see that they also need to take the mastercase out of that pallet physically. Without selecting this option, if you remove a mastercase from a pallet, the location will not have any knowledge of this process. This means that the repair you’ve performed will only stay as virtual, and physically the child product will still be inside its parent.
6 How to use the WIR Repair Tool
WIR Repair Tool reads the data you provide on which products needs to get repaired via an excel file.
Here is an exemplary screenshot of the needed excel file template:
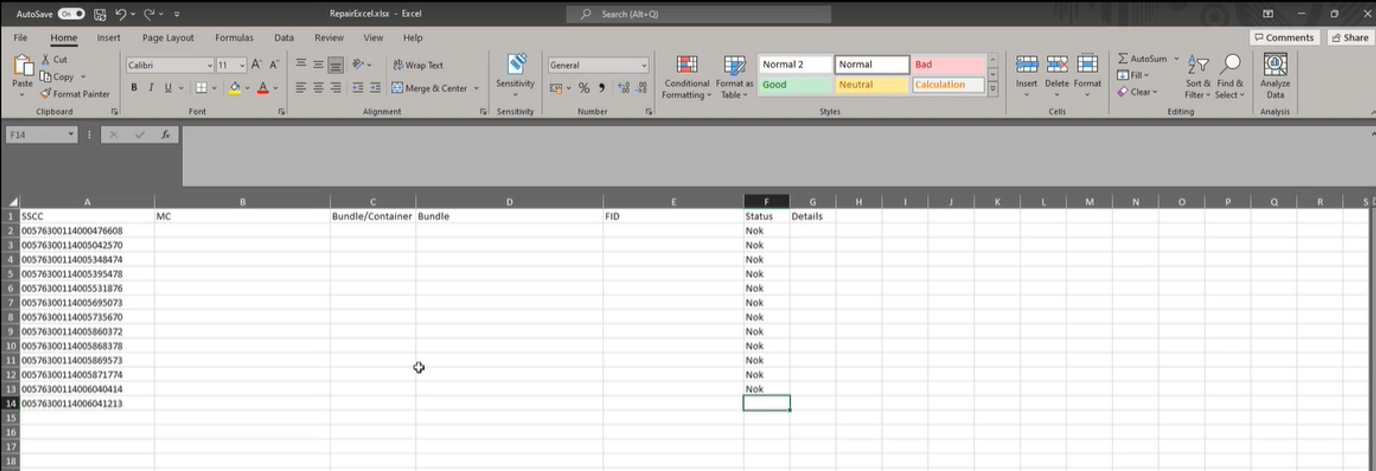
While filling this file, you must put the SSCC or MC number and its status.
You can put down any status, and there are no pre-determined options. The status section is used for categorizing the products while repairing. For example, if you are going to repair all the products listed in the SSCC column, it does not matter which status you enter. But if you are going to split the products during the repair process, it’s suggested to write down different statuses for categorization.
-
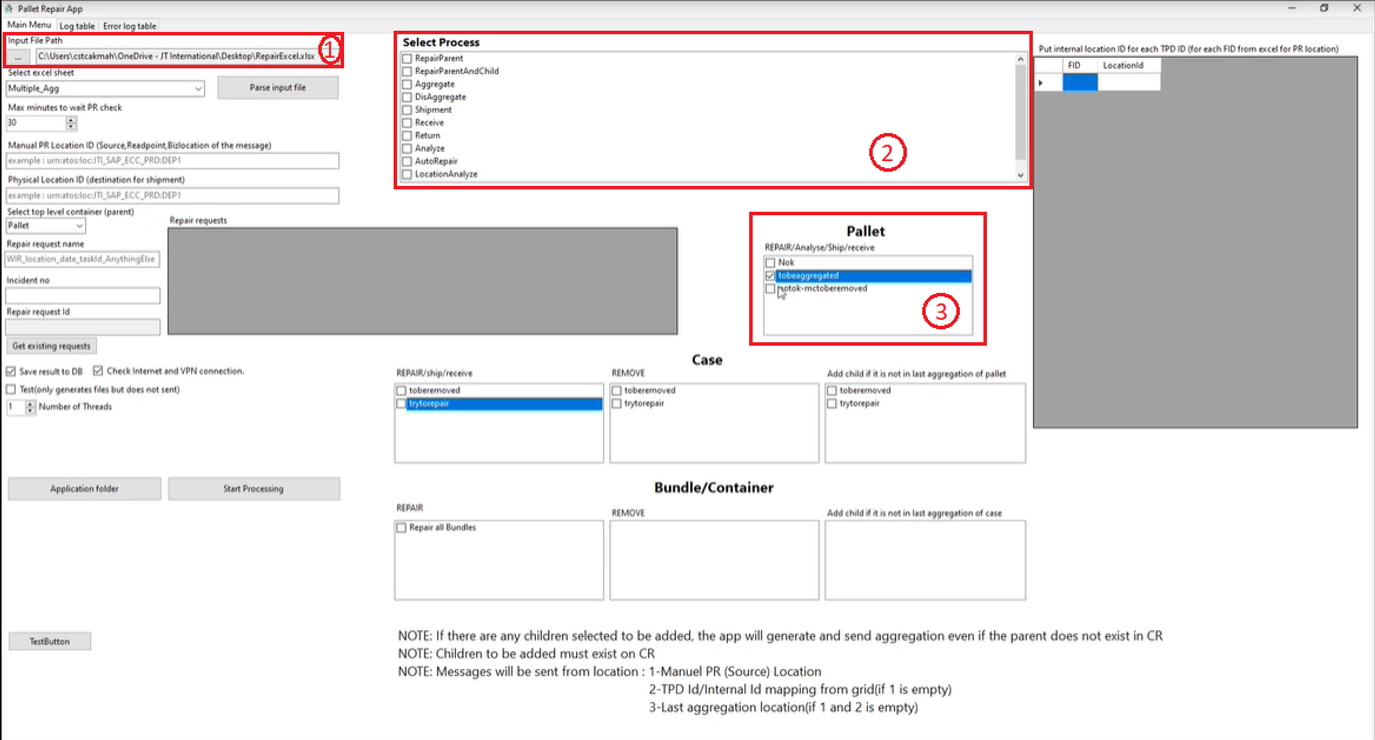
You can upload the resource file filled with pallets and mastercases that need repairing via an excel file from the “Input File Path” section seen in the screenshot above as section 1.
-
You can select the process that needs to be implemented via “Select Option” seen in the screenshot above as section 2.
-
You can select the pallet according to the status info you entered in the resource excel file via “Pallet” option seen in the screenshot above as section 3. You can use the “Status” column in the resource excel file as a short note while determining which process you need during the repair. (e.g., If you need to perform aggregation for a pallet, you can add its status as “tobeaggregated” to remind yourself.)
-
“Manual PR Location ID” and “Physical Location ID” sections were while performing shipment and reception. Currently, these sections are obsolete since WIR Repair Tool is not used for performing shipment and reception during the repair. Because every location can handle this process on its own. Performing shipment and reception is just virtual if it’s solely done by WIR Team, and there is no physical corresponding action without the location’s assistance. That is why it’s not compliant with the Track and Trace process.
7 Details on repairing depending on the process
7.1 Preparation before starting the process
-
Prepare the resource excel file as described and put down all the products you need with the status as a categorization tag.
-
Click on the checkbox of which option you will use via the “Select Process” section.
-
Click on the checkbox of which products you want to repair according to their status tag previously determined while filling the resource excel file.
-
Put down the incident that has been created for this repairing task in the “Incident no” textbox. For every repairing task you are going to perform, you need to create a corresponding ITSP incident.
-
Fill out the “Repair request name” section. If WIR Team is performing this repairing task, it will be filled out as “WIR_location_date_taskId_AnythingElse”. The “AnythingElse” part is to add additional notes if there are any. Other than that, it’s the default format.
-
We are unable to repair products on the bundle level. Repairing on bundle level’s disadvantage is sending too many messages to CR, which is not good for the overall system.
-
The lowest level for repairing is on mastercase level. We also do not take out problematic bundles or add more bundles to a mastercase during the repairing process.
-
The highest product count limit for repairing at the same time is fifty. If there is massive data traffic to CR and we use the WIR repair tool for repairing more than fifty contents, we might face a bottleneck issue.
7.2 Pallet repair
7.2.1 Disaggregate & Aggregate
-
The primary data input is the product code uploaded to the repair tool via the resource excel sheet.
-
While performing disaggregation and aggregation consecutively, you should choose only one option first and start the process.
-
After the process is completed, you should check the PR status and ensure that the messages you’ve sent are successfully passed before moving on to the following process.
-
Aggregating and disaggregating a product do not make any changes to the child products of a parent. The parents’ contents stay precisely the same.
-
These actions solely work on the parent’s child products altogether, according to the latest data in CR. Whatever the child products are before applying these processes, also sent completely with the parent, whether the process is aggregation or disaggregation. These processes do not add or remove any child from a parent product.
-
While aggregating or disaggregating a pallet, the repair tool gets the latest event’s message in CR. According to that message, aggregates or disaggregates the product and sends a new message to CR.
-
The process applied for these repairing options is the same as editing the message file manually.
-
Disaggregating and aggregating a pallet is mainly performed to trigger the process again after occasional temporary stoppages or errors between the CR and PR connection and to pass the unaccepted aggregations.
-
Another usage of aggregating and disaggregating a pallet might be because of implicit disaggregation. We can disaggregate and then aggregate the pallet again when we want to keep the child products of a parent the same.
7.2.2 Repair parent
-
This process is used for adding or removing one or more children from a parent.
-
We do not use “Repair parent” process on the case level. (Do not choose the “Select top level container(parent)” as “Case”.)
-
Adding a new child to a parent’s contents is rarely performed. Mostly, removing child products is a frequently applied process.
-
We can perform this process on the pallet level or mastercase level.
7.2.2.1 Taking out a mastercase from a pallet
-
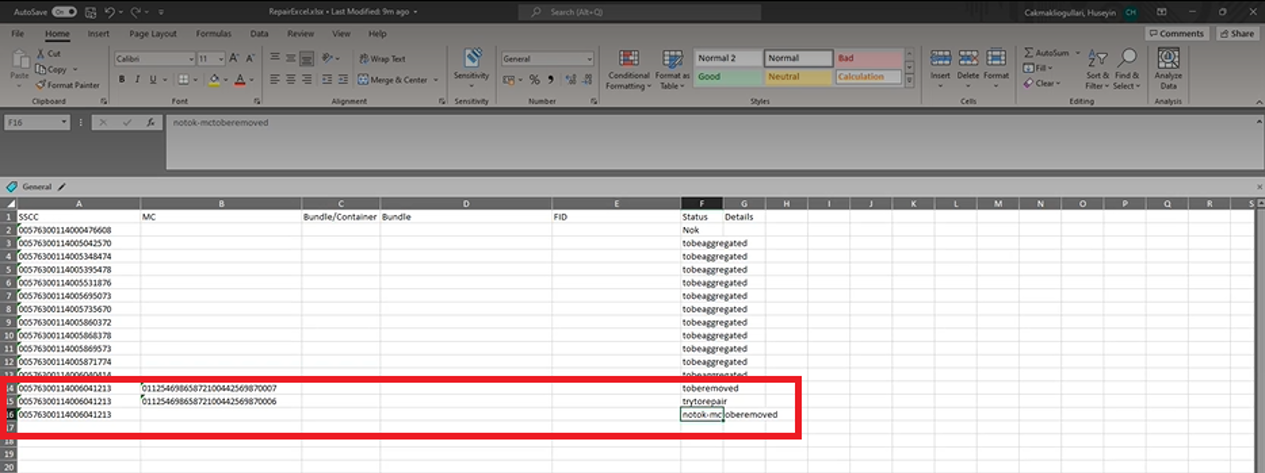
If you want to remove a mastercase from its parent pallet, you should add the MC number next to the related SSCC number.
-
If more than one child needs to be removed from the same pallet, you should put the same SSCC number again and the MC number you want to remove next to it in the next line to protect the hierarchy.
-
It’s suggested to name the status similarly when applying more than one action on the same pallet. This way, it’s easy to remember the previously made analysis and not send any wrong message to CR. Here is an exemplary excel sheet for such a process:
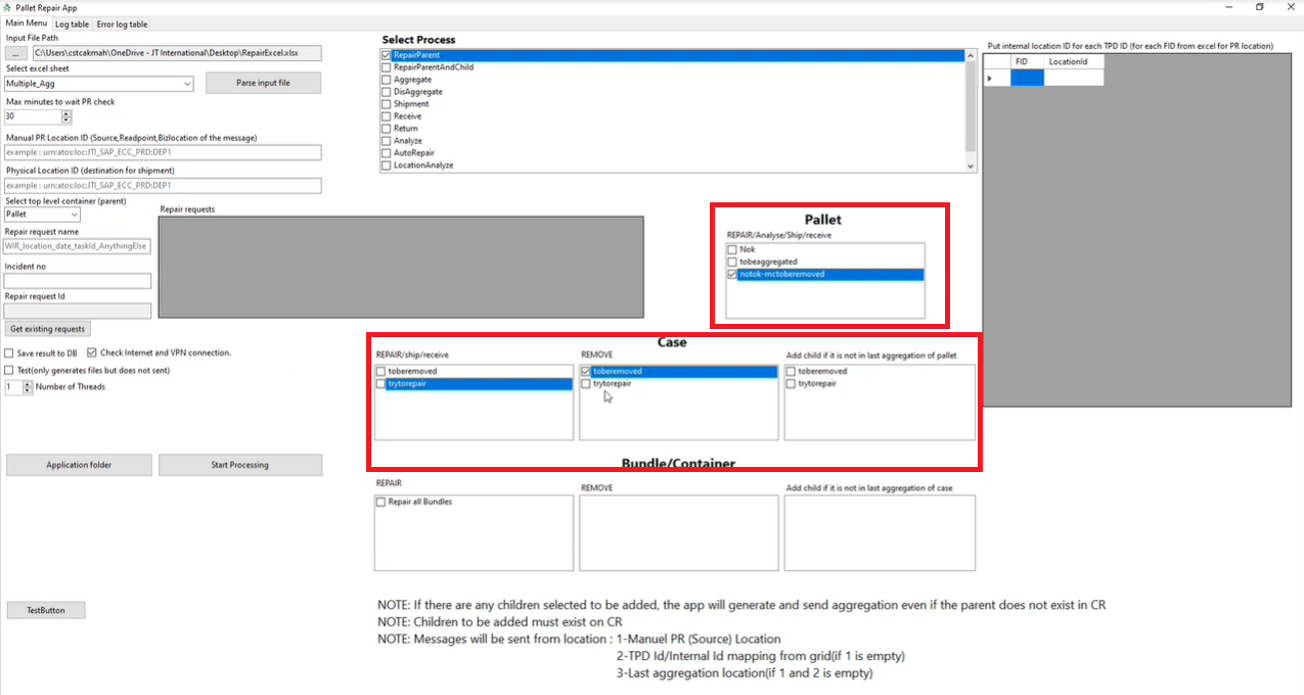
- After setting the needed status notes and uploading your resource file, you can see the details under the Pallet and Case section as in the screenshot below,and choose accordingly while handling the repair process.
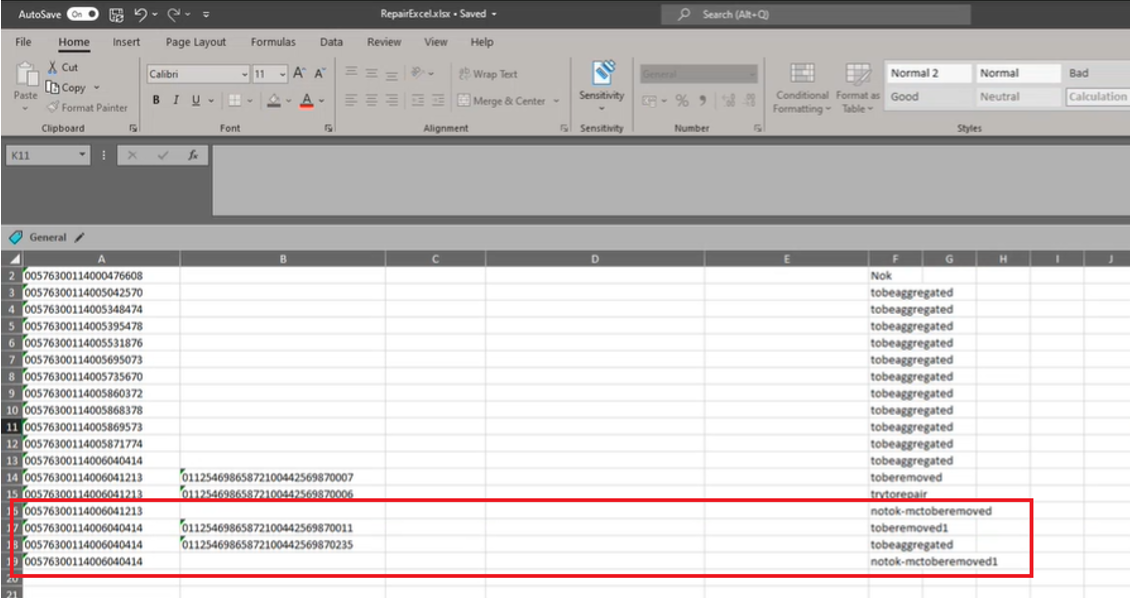
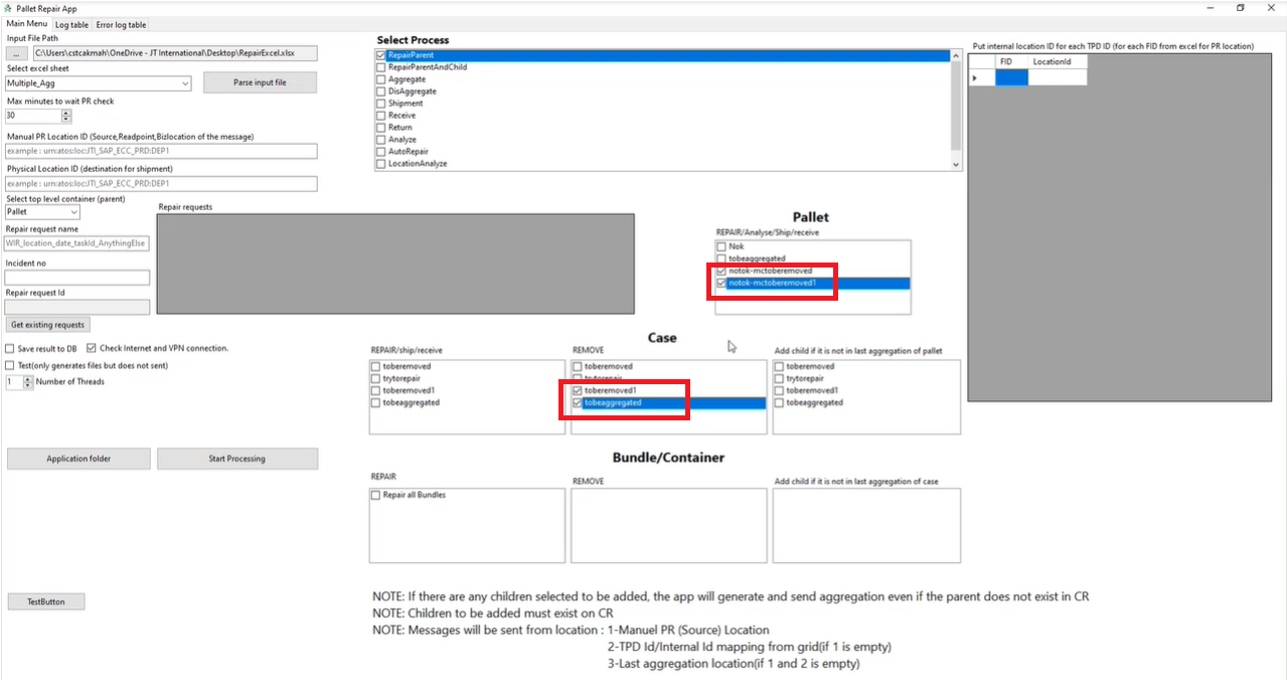
- If you want to process more than one child from a parent at the same time, you should add the status as the same. Otherwise, you must select the checkboxes for all the products separately, as seen in the exemplary excel sheet, and the final result after uploading the resource excel file to the repair tool in the screenshots below. (e.g., If there are ten children to be processed from the same parent, you need to check ten different checkboxes under the pallet and case selection section, which is extremely time-consuming compared to naming their statuses similarly.)
7.2.3 Repair parent and child
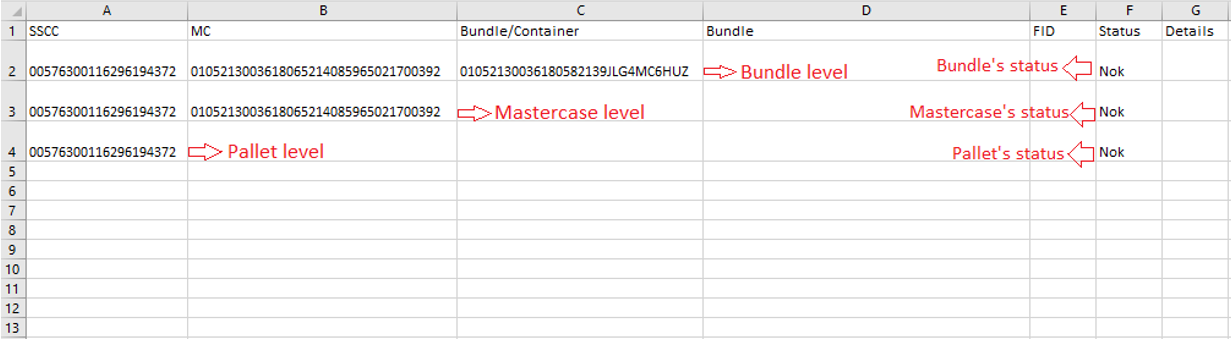
- While preparing the resource excel file, please mind the hierarchy. Here is an example if you are going to repair mastercase level:
-
While you are using this “RepairParentAndChild” option, you can select “Repair all Bundles” under the Bundle/Container repair section.
-
You cannot take a bundle out of a mastercase using WIR Repair Tool. You can only repair products until the mastercase level.
-
When there is an error on a few bundles, you can use this process. For that, you should choose “Repair all Bundles” option under the “Bundle/Container” section. In that case, the repair tool will perform disaggregation and aggregation for all the bundles.
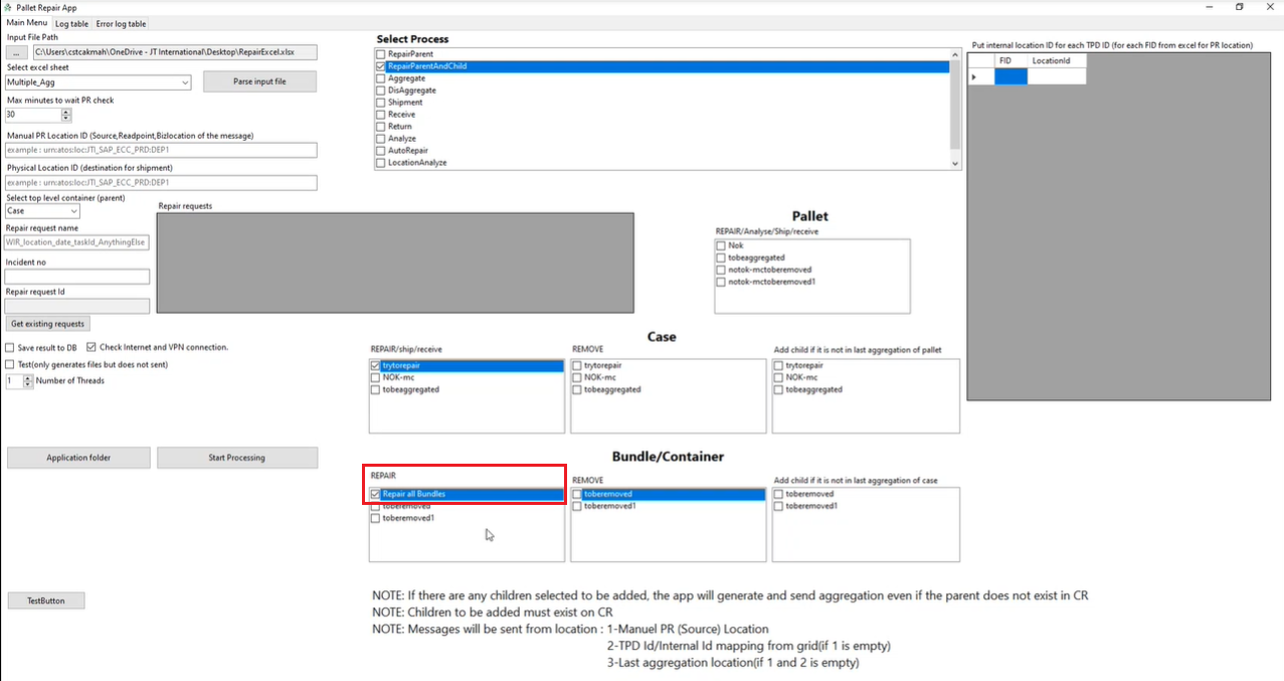
- If you need to repair just because of one bundle, instead of using “Repair all Bundles” option, you should choose according to its status you have put corresponding to the bundle that needs to get repaired in the resource excel file. This way, the repair tool will send disaggregation and aggregation messages specifically for the problematic bundle.
- We also use this process option to repair pallets and the child at the same time. WIR repair tool’s process works like this:
- Sends disaggregation message for the pallet
- Sends disaggregation message for the mastercase
- Sends aggregation message for the mastercase
- Sends aggregation message for the pallet
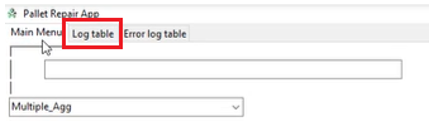
- After each step, the WIR repair tool checks the PR status of the sent messages and shows the result on the “Log table”.
8 Backlog & Process improvement plans
Currently, WIR Repair Tool runs locally for each colleague who downloads this application. WIR Team is planning to move the system to Azure so everybody can conveniently reach the same up-to-date version of the tool.
9 Application process
If there are any issues or questions about using WIR Repair Tool, please contact WIR Team members to get support.
10 Document control
10.1 Contact person
Questions and feedback regarding this standard should be submitted to Huseyin Cakmakliogullari and Ogulcan Firat
10.2 Revision History
| Version | Effective date | Purpose of change | Author |
|---|---|---|---|
| 1 | 20-Jun-2022 | First version of the document | Seval Altug |
11 References
ANY QUESTIONS?